Database clients
NotebooksThe following is a list of available DatabaseClient implementations in notebooks, along with instructions on how to connect to them.
Amazon Redshift (PostgreSQL driver)
See our standard instructions for Connecting to databases, choosing PostgreSQL for the database Type where prompted.
BigQuery
See our standard instructions for Connecting to databases.
Databricks
See our standard instructions for Connecting to databases.
Datasette
Note
This content is updated from Alex Garcia’s original notebook Hello, Datasette.
Datasette allows you to easily publish a SQLite database online, with a helpful UI for exploring the dataset and an API that you can use to programmatically query the database with SQL.
This client, which you can import into your own notebooks, simplifies access to that API, allowing you to query Datasette instances using SQL cells.
Make sure your Datasette instance has CORS enabled (pass in the --cors flag), and it will be ready to go with Observable.
To use in your Observable notebook, first import the client:
import {DatasetteClient} from "@ambassadors/datasette-client"To create a new database cell that points to a Datasette instance, use new DatasetteClient(url) like so:
congress = new DatasetteClient(
  "https://congress-legislators.datasettes.com/legislators"
)
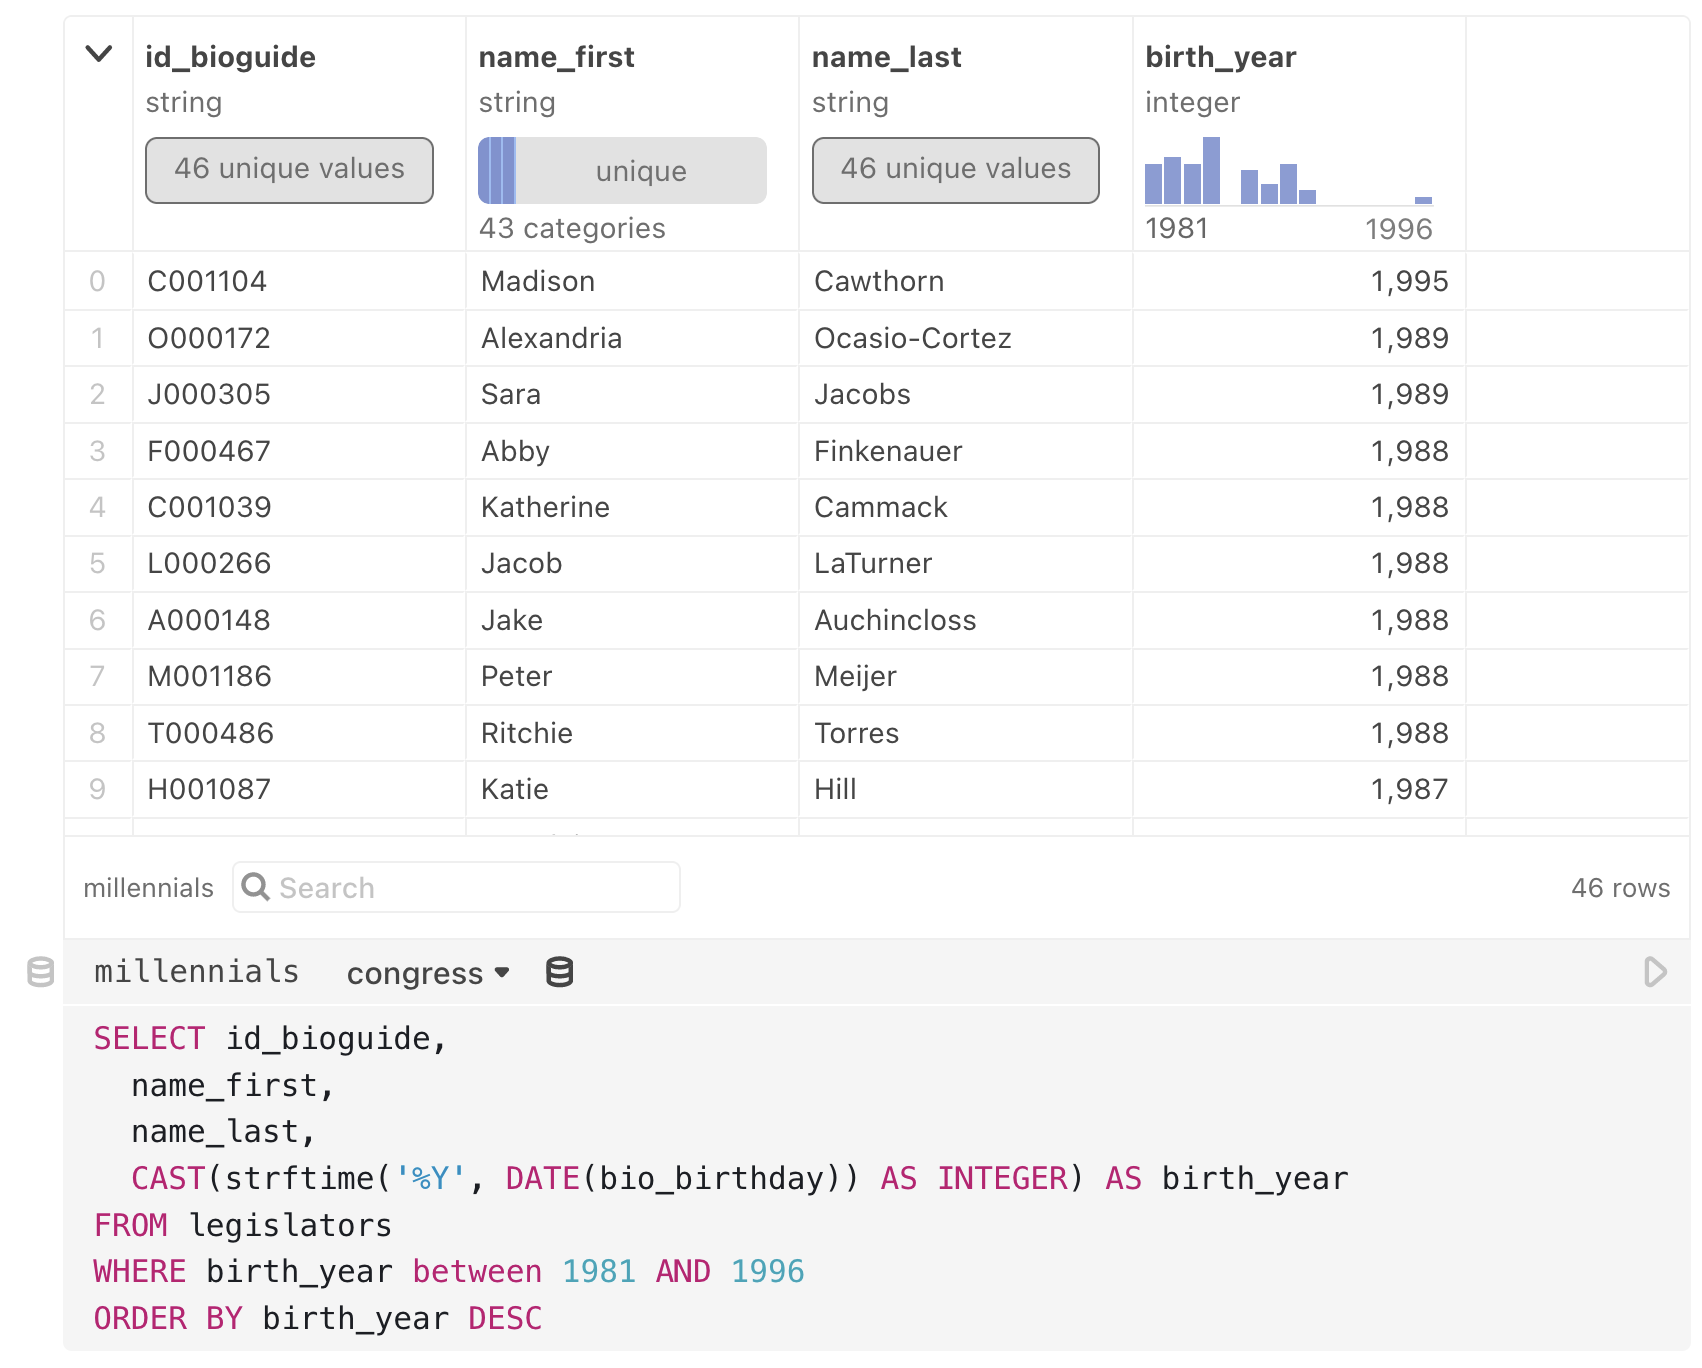
Now you can use the congress cell as a database in a SQL cell. Insert a new SQL cell from the Add cell menu, then choose the database as a source (note that congress is selected as the database in the SQL cell below):
Dolt
To use in your Observable notebook:
import {DoltDatabaseClient} from "@observablehq/dolt"Then call the DoltDatabaseClient constructor:
db = new DoltDatabaseClient({
  host: "https://www.dolthub.com",
  owner: "dolthub",
  repo: "SHAQ"
})
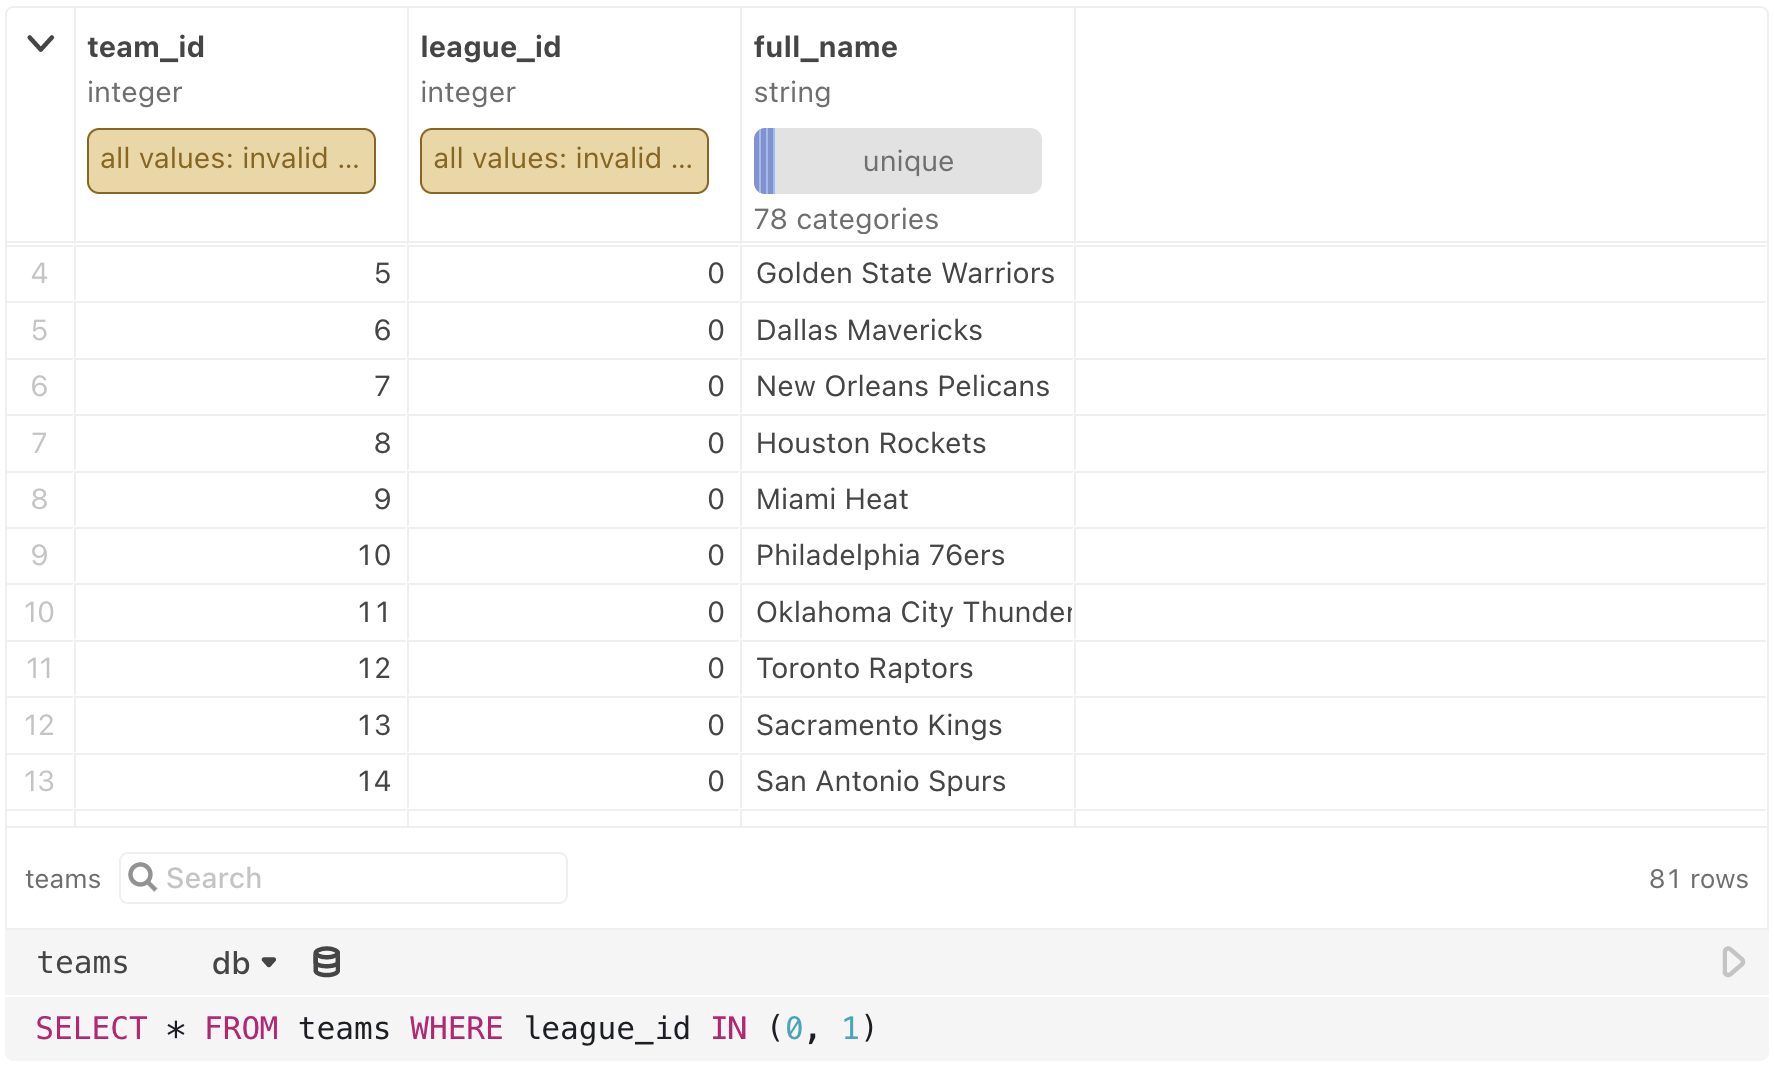
Query the database (db) in Observable’s SQL cell:
DuckDB
Observable’s DuckDB client lets you query tabular data of any form using SQL. DuckDB supports a variety of popular file formats, including CSV, TSV, JSON, Apache Arrow, and Apache Parquet. You can also query in-memory data such as arrays of objects and Apache Arrow tables.
To get started, first create a client by calling DuckDBClient.of(tables) in a JavaScript cell. For example, the gaiadb client below has a single table, gaia, populated from an Arrow file, gaia-sample.arrow. (This astronomical data is from the Gaia Archive via Jeff Heer.)
gaiadb = DuckDBClient.of({
  gaia: FileAttachment("gaia-sample.arrow")
})
The tables argument to DuckDBClient.of defines the tables of the database. Each key represents a table name, while the value corresponds to the table’s data. Data can be expressed in a variety of forms:
- A CSV file (.csv)
- A TSV file (.tsv)
- A JSON file (.json)
- An Arrow file (.arrow)
- A Parquet file (.parquet)
- An Arrow table (Apache Arrow version 9 or later)
- An array of objects
Once you’ve declared your DuckDBClient in a cell, create a SQL cell or data table cell and select your client as the data source. For example, the SQL cell below selects a random sample from the gaia table.
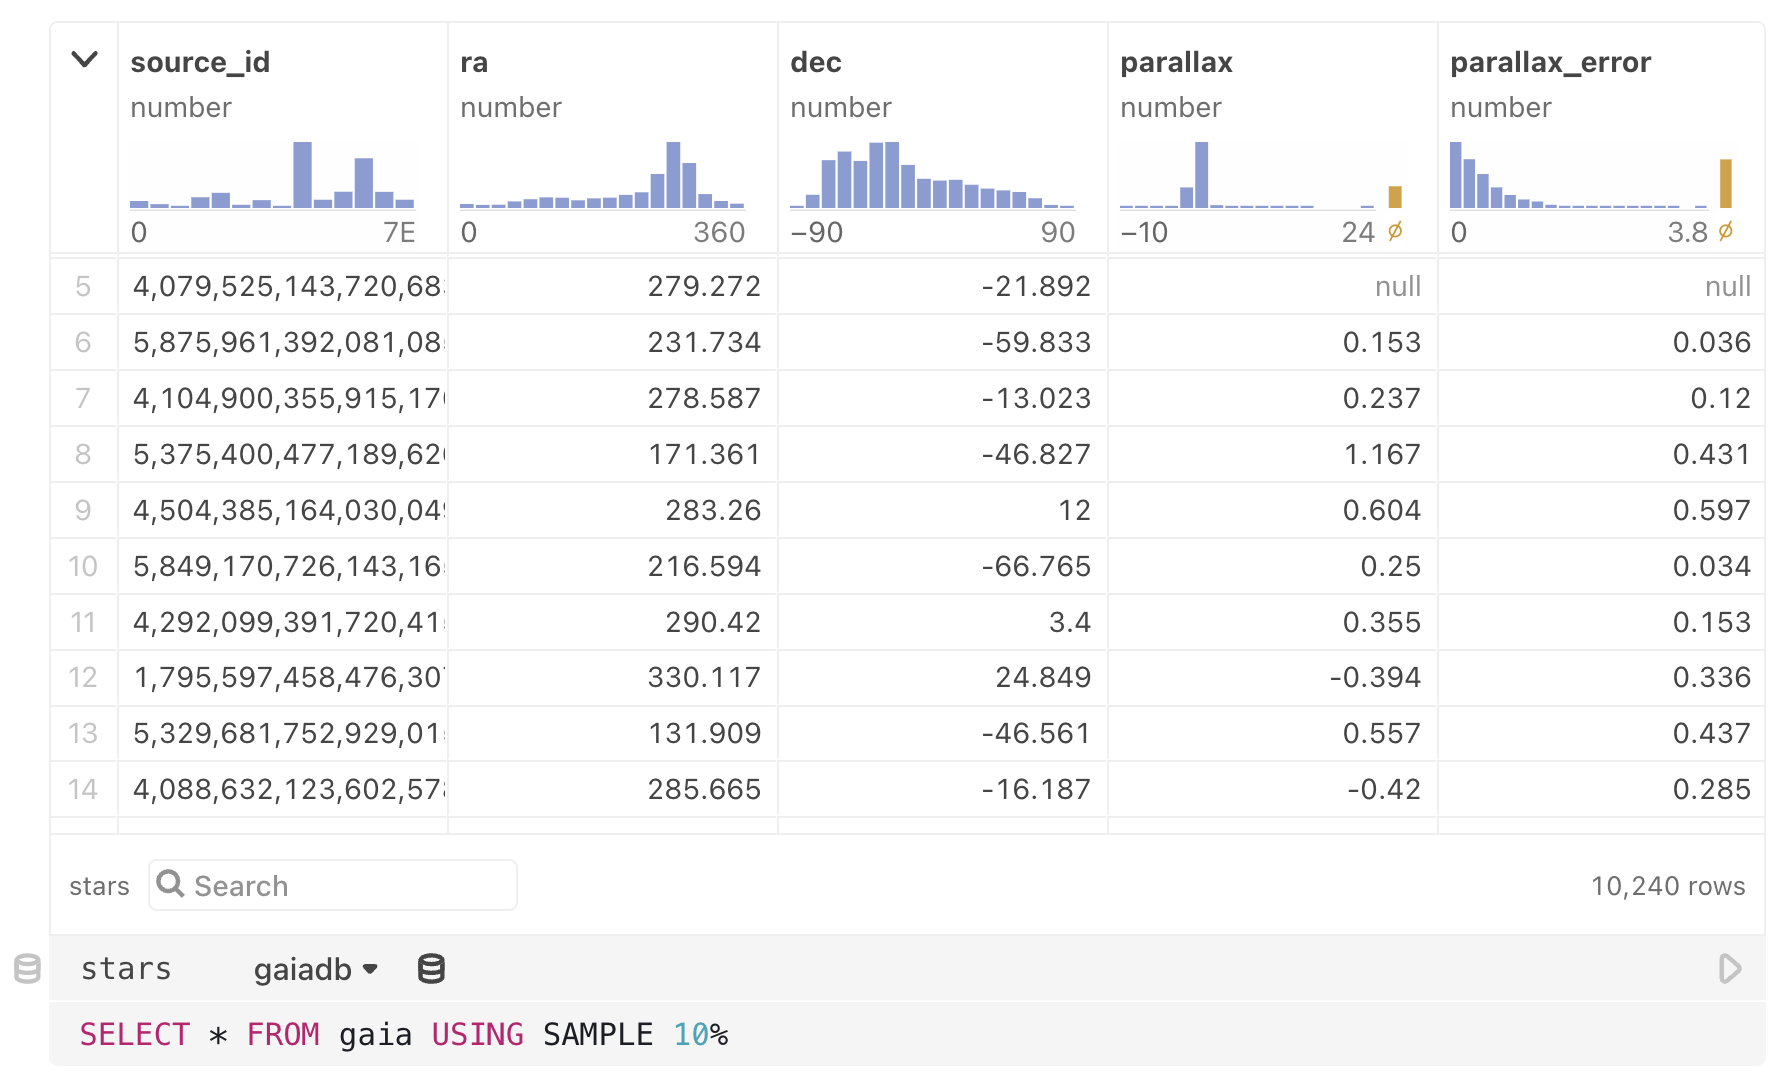
By naming the SQL cell, such as stars above, you can access the query results from another cell. The query results are represented as an array of objects.
You can specify multiple tables when creating your DuckDBClient. Tables do not need to come from identical file types—you can mix and match data formats for different tables, for example to join data from a CSV file with JSON data fetched from an API. Conveniently, DuckDB does automatic type inference on CSV and TSV files.
The code below (in a JavaScript cell) creates a new database client named stocks. The database contains four tables: aapl, amzn, goog, and ibm.
stocks = DuckDBClient.of({
  aapl: FileAttachment("aapl.csv"),
  amzn: FileAttachment("amzn.csv"),
  goog: FileAttachment("goog.csv"),
  ibm: FileAttachment("ibm.csv")
})
To pass additional options to the underlying AsyncDuckDB instance when creating tables, pass a {file, …options} object as the table value instead of a bare file, or similarly a {data, …options} object instead of the data directly. For example, below we specify the dateFormat option for CSV files, allowing DuckDB to parse dates not in the ISO 8601 format.
moviesdb = DuckDBClient.of({
  movies: {
    file: FileAttachment("movies.csv"),
    dateFormat: "%b %d %Y" // e.g. Jun 12 1998
  }
})
You can also use the JavaScript DuckDBClient API directly:
- db.query(string, params, options)
- db.queryRow(string, params, options)
- db.queryStream(string, params, options)
- db.sql(strings, …params)
- db.describeTables({schema, database})
- db.describeColumns({table, schema, database})
For example, using the stocks database created above, you can use the API directly in a JavaScript cell:
stocks.query("SELECT Open, Close, Volume FROM aapl WHERE Volume > ?", [100_000_000])See the DatabaseClient specification for details on JavaScript DuckDBClient API methods.
In some cases, it may also be convenient to create derived views with DuckDB.
Note
Our DuckDB database client implementation is based on previous work by the CMU Data Interaction Group and uses the WebAssembly version of DuckDB. It is released under the ISC license as part of the Observable standard library.
HEAVY.AI
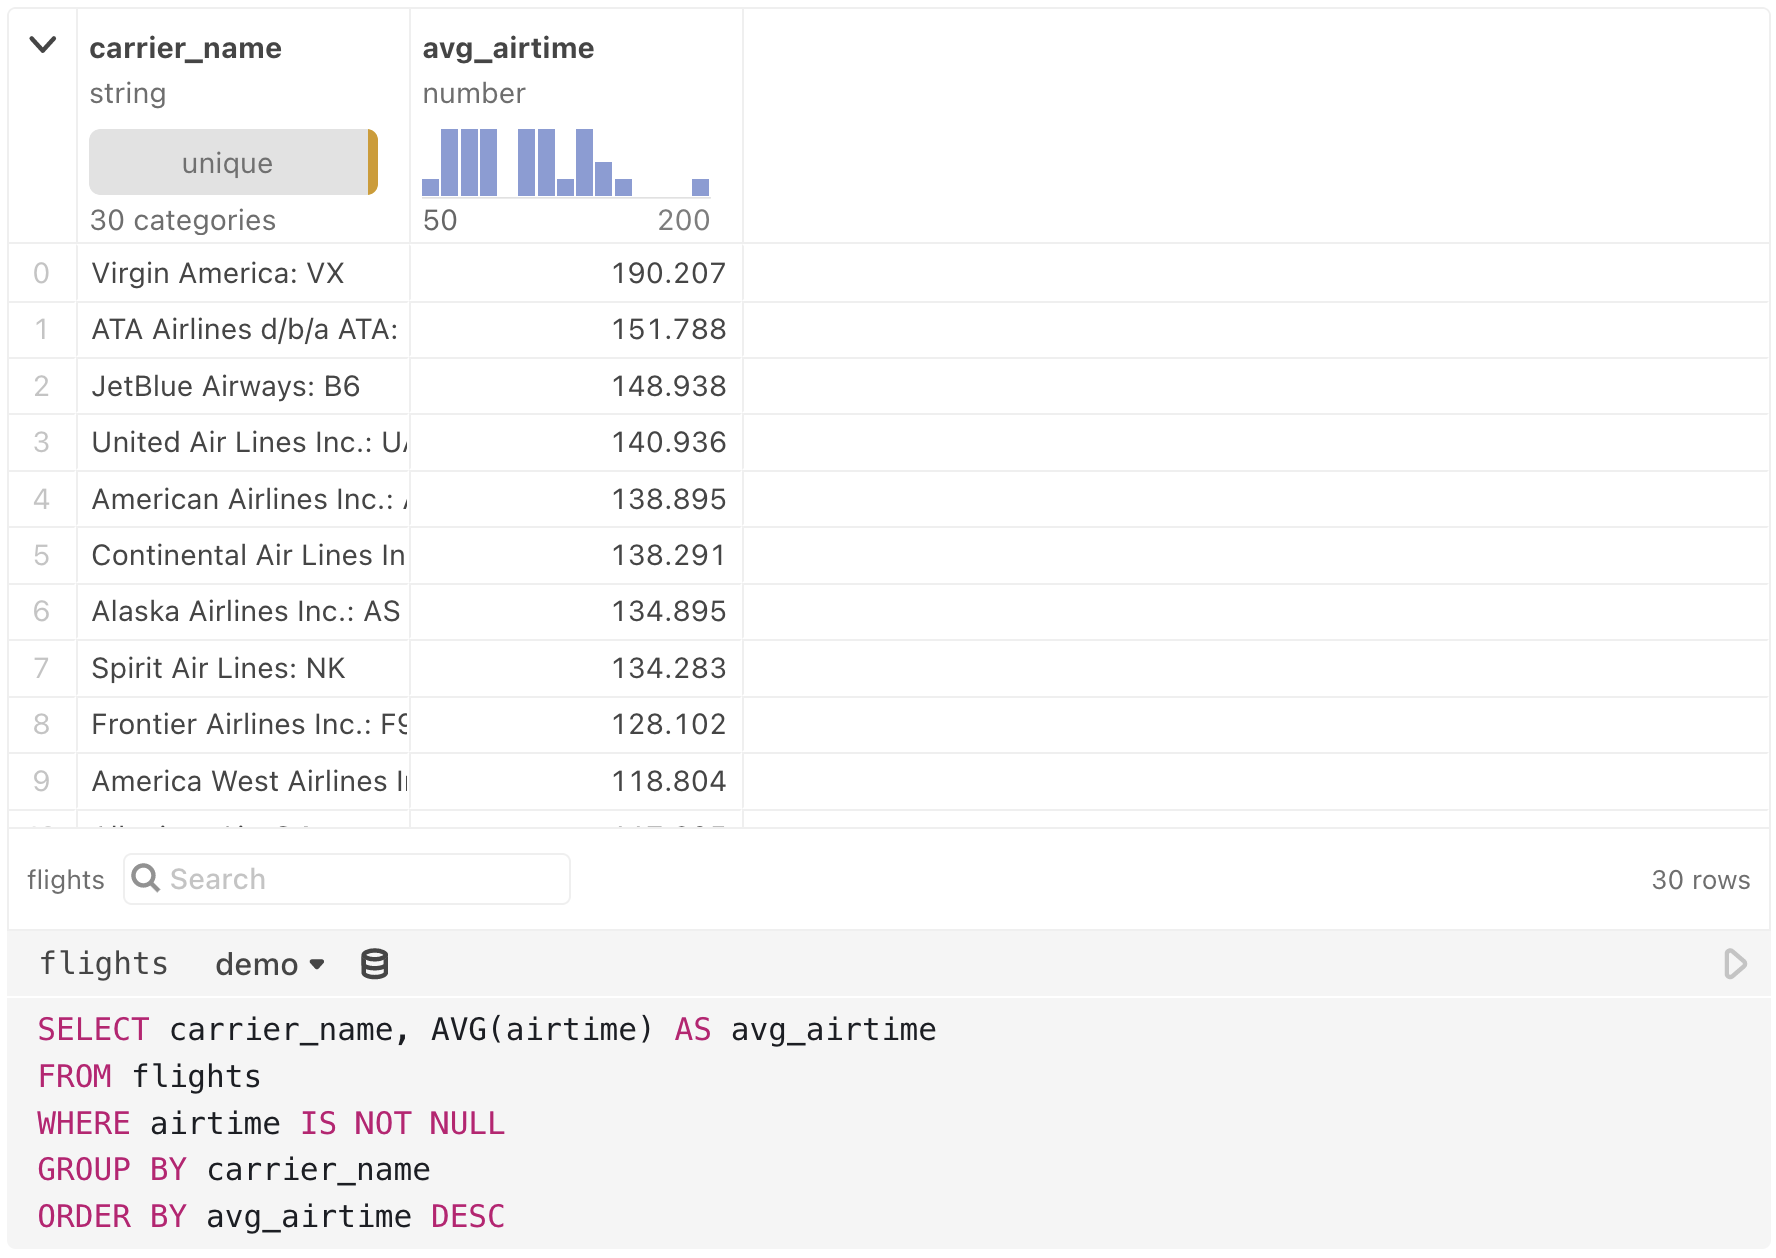
To use HEAVY.AI (formerly known as OmniSci and MapD) in your notebook:
import {HeavyAIDatabaseClient} from "@observablehq/heavyai"Then call HeavyAIDatabaseClient.open, and use the result with a SQL cell.
demo = HeavyAIDatabaseClient.open({
  protocol: "https",
  host: "demo-flights.heavy.ai",
  port: "443",
  dbName: "newflights",
  user: "demouser",
  password: "HyperInteractive"
})
MariaDB (MySQL driver)
See our standard instructions for Connecting to databases, choosing MySQL for the database Type where prompted.
Mongo SQL
See our standard instructions for Connecting to databases.
MySQL
See our standard instructions for Connecting to databases.
Oracle
In order to connect to Oracle, you will have to self-host a database proxy. The database proxy is a simple Node.js webserver that accepts secure requests from your Observable notebooks, and proxies queries to a PostgreSQL, MySQL, Snowflake, SQL Server, Databricks or Oracle database. You can use the database proxy to securely connect to databases on your local computer, on an intranet or within a VPN.
Install the database proxy locally or globally with npm or yarn:
npm install -g @observablehq/database-proxyyarn global add @observablehq/database-proxyInstalling for Oracle databases
To use the Oracle database client, you will also need to install the oracledb npm library with npm or yarn:
npm install -g oracledbyarn global add oracldebArchitecture
Node-oracledb is an add-on available as C source code. Pre-built binaries are available as a convenience for common architectures (Windows 64-bit, Linux x86_64, and macOS (Intel x86)). For other architectures (i.e macOS (ARM64)), you will need to build from the source code as described here.
Oracle Client Library
One of the Oracle Client libraries version 21, 19, 18, 12, or 11.2 needs to be installed in your operating system library search path such as PATH on Windows or LD_LIBRARY_PATH on Linux. On macOS link the libraries to /usr/local/lib.
For more information see node-oracledb documentation.
Running the database proxy
Usage: observable-database-proxy <command> <name> [options]
Commands:
start <name> [ssl options]Start a database proxy serveradd <name>Add a new database proxy configurationremove <name>Remove an existing database proxy configurationreset <name>Reset the shared secret for an existing database proxy configurationlistList all configured database proxies
When adding a database proxy configuration, a window will be opened to ObservableHQ.com to configure the connection in your Database Settings and set the shared secret. Subsequent starts of the database proxy do not require re-configuration.
Examples:
  $ observable-database-proxy start localdb

  $ observable-database-proxy add localssl
  $ observable-database-proxy start localssl --sslcert ~/.ssl/localhost.crt --sslkey ~/.ssl/localhost.key
Configuration storage
All proxy configuration is stored in ~/.observablehq. You can delete the file to remove all of your database proxy configuration at once.
SSL Certificates
If you’re using Chrome or Edge, and running the database proxy on your local computer (at 127.0.0.1), you can connect to it directly with HTTP—there’s no need to set up a self-signed SSL certificate for the proxy.
If you’re using Firefox or Safari, or if you wish to run the database proxy on a different computer on your intranet, you can create a self-signed SSL certificate and configure the database proxy to use it in order to proxy over HTTPS. Be sure to “Require SSL/TLS” in the Observable configuration, and specify the --sslcert and --sslkey options when running the database proxy.
Using from notebooks
After the proxy is running, in one of your private notebooks, use DatabaseClient("name") to create a database client pointed at your local proxy. When querying, your data and database credentials never leave your local computer. See Self-hosted database proxies for more information about how to use it from Observable.
PostgreSQL
See our standard instructions for Connecting to databases.
QuestDB
To use QuestDB in an Observable notebook:
import {QuestDatabaseClient} from "@observablehq/questdb"Call the QuestDatabaseClient constructor (here using the QuestDB demo instance), then query the database in Observable’s SQL cell:
db = new QuestDatabaseClient("https://demo.questdb.io")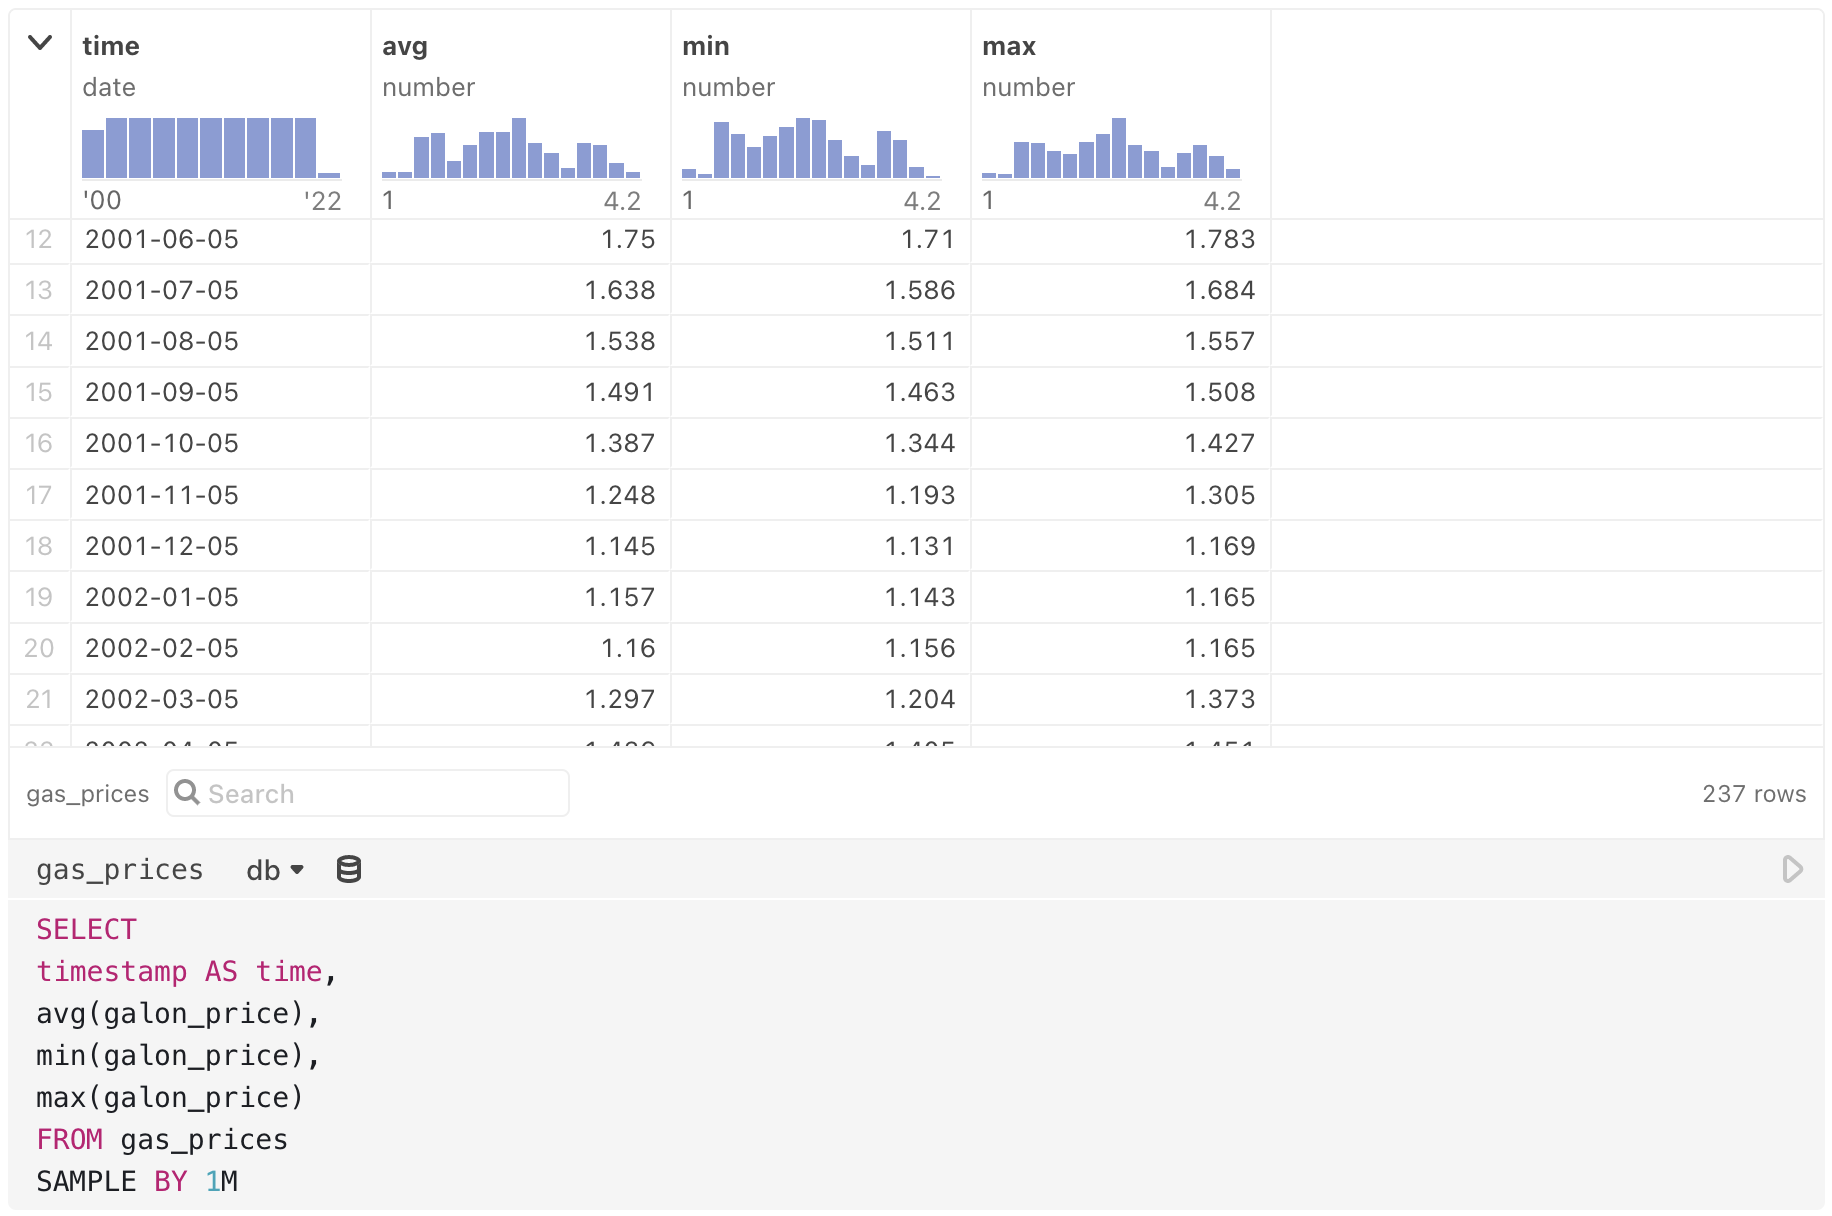
Named query outputs (like gas_prices above) can be piped into other cells, for example into a JavaScript cell to create a chart with Observable Plot:
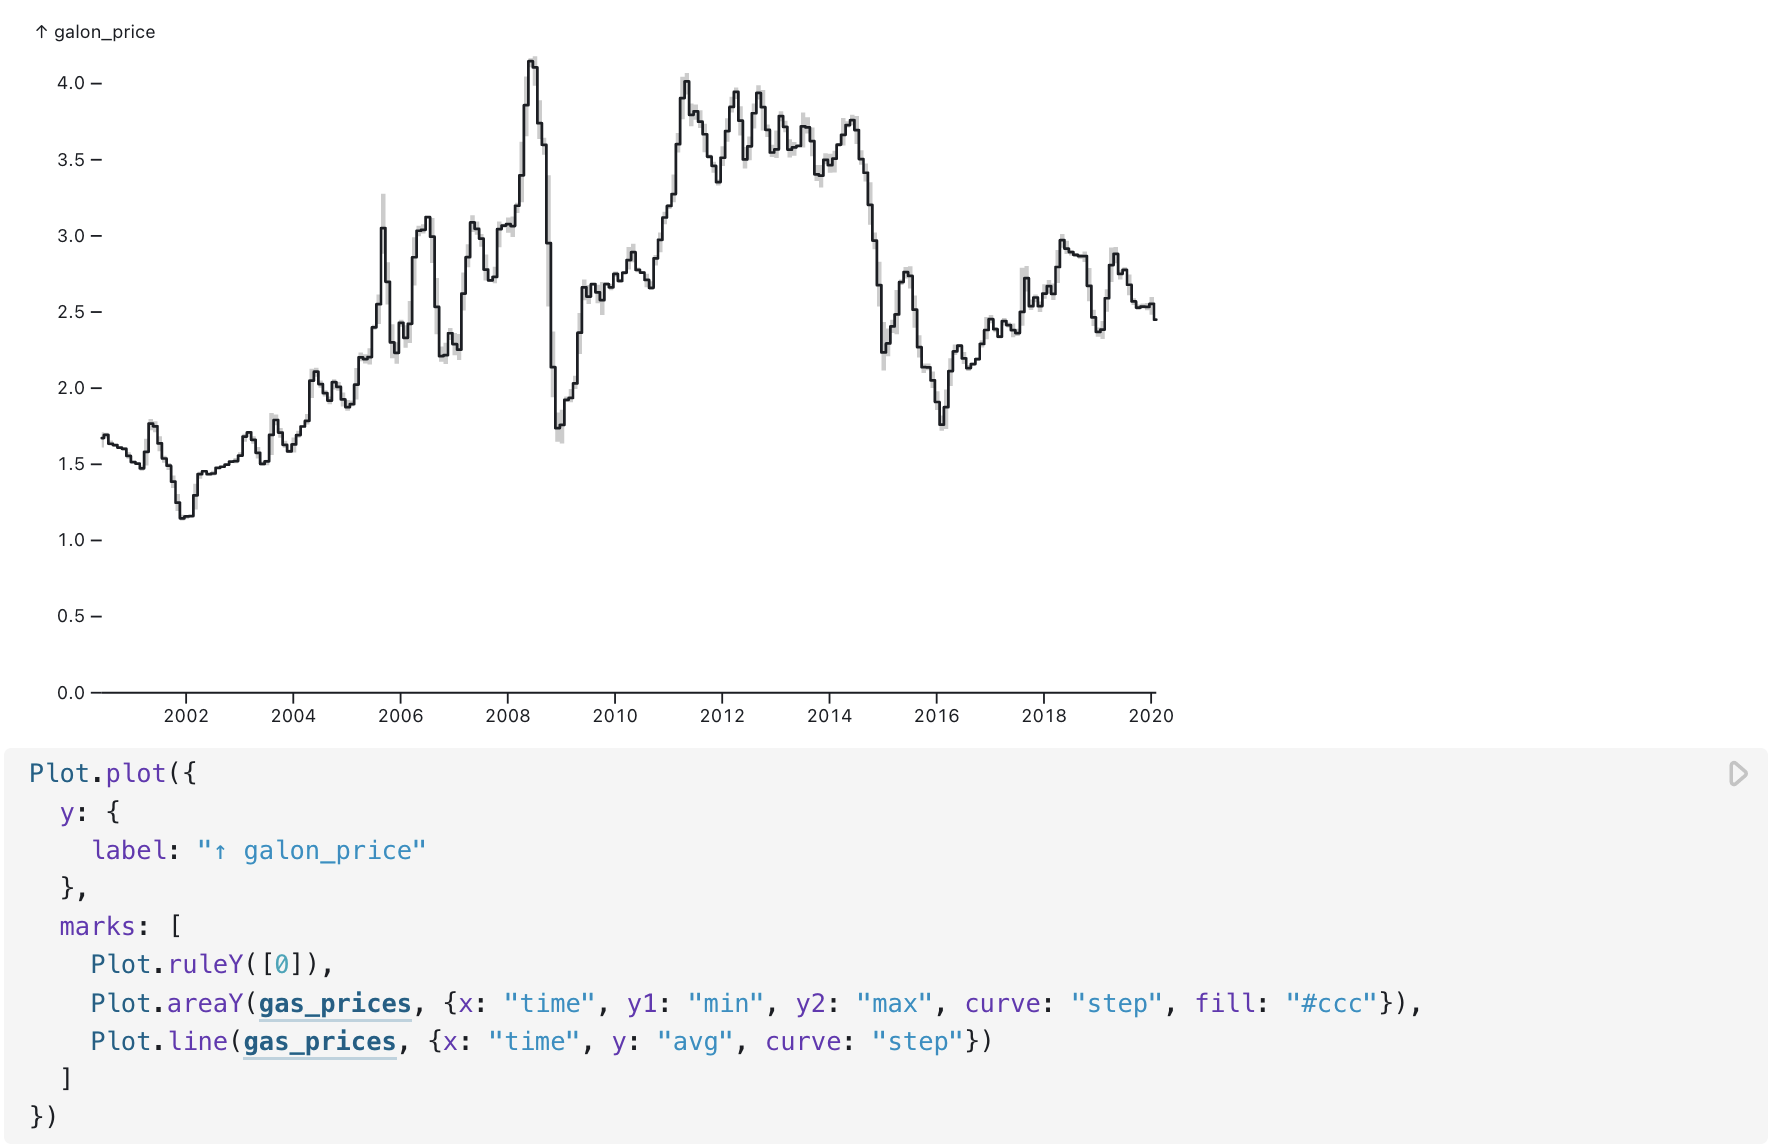
Snowflake
See our standard instructions for Connecting to databases.
SQL Server
See our standard instructions for Connecting to databases.
SQLite
See our documentation for attaching and working with SQLite files in Observable.
Trino/Presto
Observable’s Trino/Presto client lets you explore and querytables hosted on Trino servers in your notebooks. The client is intended to conform to the Trino’s client REST API, and Observable’s DatabaseClient Specification.
To use in an Observable notebook:
import {TrinoDatabaseClient} from "@observablehq/trino-presto"trinoDatabase = new TrinoDatabaseClient({ ...options })Options
| NAME | DESCRIPTION | DEFAULT VALUE |
|---|---|---|
| host | Trino host name | [REQUIRED] |
| user | Trino user name | “trino” |
| customFetchHeaders | An object with custom headers added to all fetch requests | {} |
| customFetchOptions | An object with custom options added to all fetch requests | {} |
| corsMode | The CORS fetch mode value | “cors” |
| excludedCatalogs | An array of Trino catalogs excluded from table search | [“jmx”] |
| pollDelayMs | Delay (in milliseconds) between polling database service | [REQUIRED] |
NoteS
- By default the client excludes the JMX catalog from the catalog list when browsing tables. You can change this behavior with the excludedCatalogs option.
- We have been unable to find Trino configuration to allow cross-origin requests. We recommend you setup your own CORS proxy, for example CORS Anywhere. You can also use something like CorsProxy.io, though involving a 3rd party is less secure.
Example
The example code below configures a TrinoDatabaseClient to connect to a demonstration Trino database and use CorsProxy.io to allow cross-origin requests.
trinoDatabase = new TrinoDatabaseClient({
  host: `${CORS_PROXY}${DEMO_TRINO_HOST}`,
  user: DEFAULT_TRINO_USER
})
Explore and SQL Query
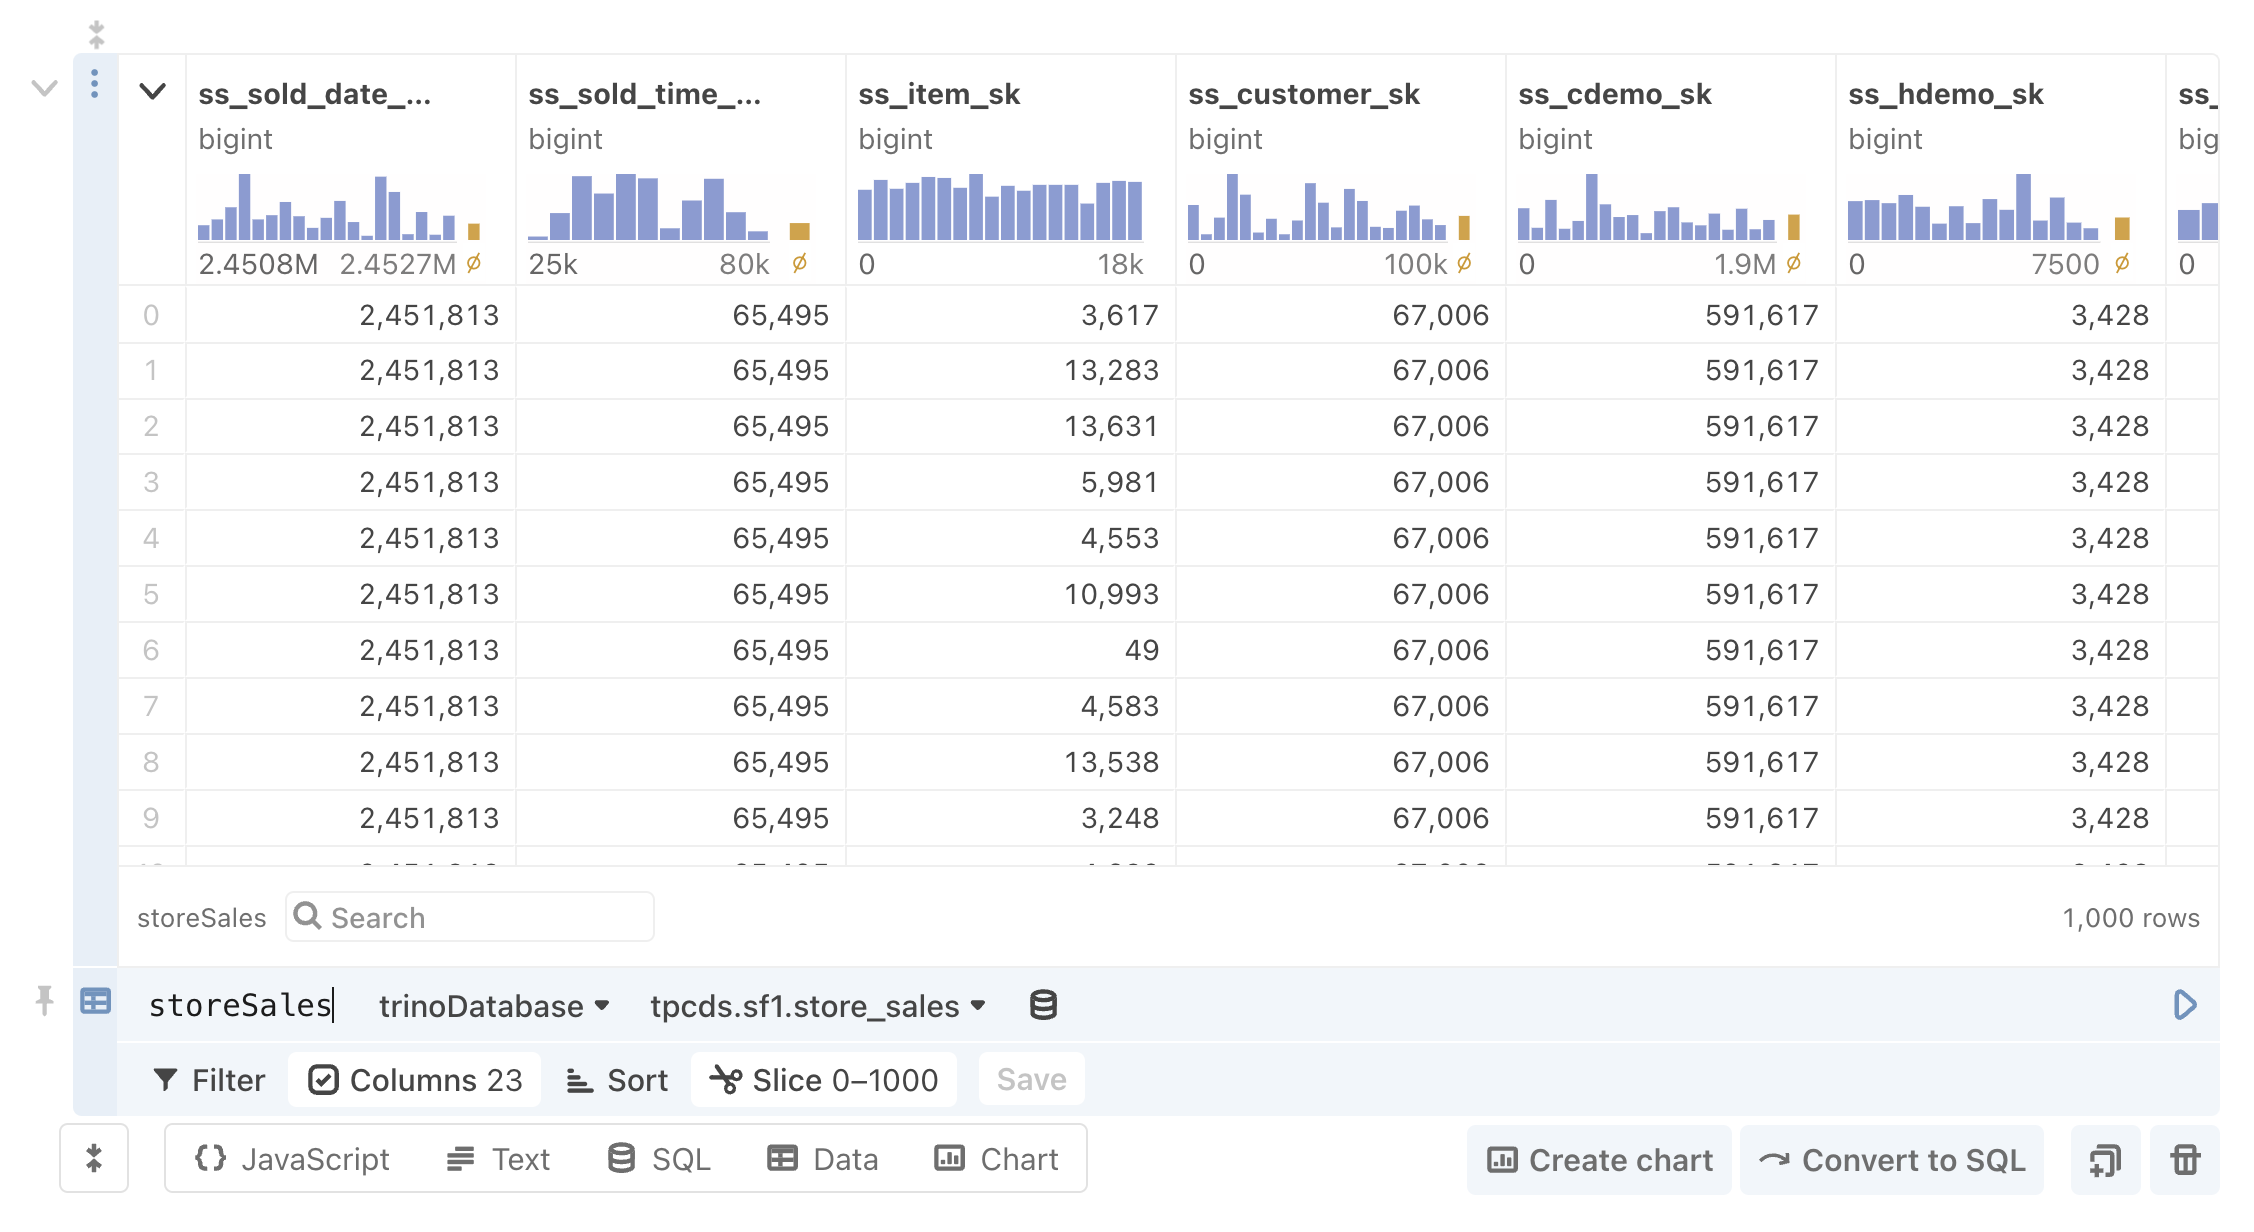
Once you have created the database client, you can explore tables using Data Table cells (shown below), or query the database in a SQL cell:
